Wednesday, March 10, 2010

Lets make a funky elephant!!!!!

Sorry for the late posting. Wednesday kind of creeped up on me.

I was recently going through my cloths and found ol pj's that had a hole in them but they were to cute to throw away. So I racked my brain trying to think of something I can make out of them. Then it came to me..... AN ELEPHANT!


Why? Well, my son Levon loves the animals in his room and on the walls. Everynight we say our prayers and tell all the animals on the wall good night. As we tell all the animals, including the elephant, good night. Levon waves to each and every one of them as if they are all his friends. So, I decided to make him an elephant to sleep with.


Step 1:
Fold a peice of fabric in half so it is wrong side facing wrong side.  Draw an outline of an elephant (or any animal, critter, monster, or doll.) 


Cut around your drawing. And you will have 2 elephants.


Step 2:

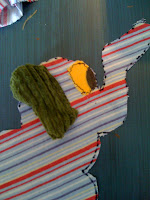
Take a piece of ribbon and cut out 2 oval pieces and draw eyeballs.


Sew on eye balls.


Step 3:

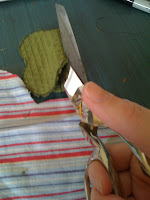
Make the ears out of a different color of fabric. Make the ear whatever shape you want. Make two of the same shape for each ear. Sew both pieces together with the pretty sides together. Leave an opening so you can turn it right side out.  Fold the un sewn edges of the ears inward and sew to the elephant.


Step 4:
Sew the two pieces of the elephant together. Leave an opening for stuffing.  Stuff the elephant with as much stuffing as you can. When you sew the elephant sew it with seams out so it will frey with washing. Sew the opening you stuffed with together.

YOU DID IT!


Thanks For Reading!!!!!!!

Friday, March 5, 2010

I feel pretty! Oh so pretty!

So it's March....finally.....and that means Spring is right around the corner.  Woot!  Spring means no more dark dreary colors, both in the sky and in your closet!  Don't get me wrong, I love winter fashions of warm sweaters and big coats, freshly knitted gloves and hats (*wink, Savvy), but I L-O-V-E when I can bust out a bright blue top, some hot purple, and even a lighter shade of my favorite red, (dare I say it?)  PINK!  Spring is in the air, even if it doesn't quite show on the thermometer, yet. 

So if you are like me and don't live in sunny Florida, you might still be feeling the chill.  What's the best way to perk up for spring even if you can't let go of your jacket yet?  Nail polish, bien sur! (and if you can get a full-out mani/pedi, so much the better)  OPI is a staple of my wardrobe (Black Cherry Chutney, Lincoln Park After Dark, I'm Not Really a Waitress, Friar Friar Pants on Fire, as well as OPI Red, Cha-Ching Cherry, It's All Greek to Me....classics!  The new Off With Her Red is fanfoxintastic), and I like to change it up!  And, yes, the pinks are what I cling to when I have worn my dark purples and deep reds all winter.  My pink of choice to brighten my day as well as my toes?  Flashbulb Fuschia!!!!!  It's a lil pink, a lil purple, and in their Brights collection so it makes me happy! 

So....if you are feelin the Spring Fever and still having to put on your gloves when you walk outside....put on a foxy pink nail polish that will immediately make you feel fabulous when you take those gloves off! 


Stay stylin....like a fox!!

Thursday, March 4, 2010

Need a break?

Hey all... sorry for the late post this evening... but I was having a difficult computer day (paging Geeky! stat!).

I will save my longer savvy post for another day and instead share a l'il somethin' with you loyal readers!

Oh how I love me some redbox.  Have you ever used them?!  $1/1 day rentals and they are virtually EVERYWHERE.  I super super love them.  #1... it's a dollar.  A dollar for brand new movies.  #2... they are uber convenient... they are just about everywhere. Check your local McDonalds, Walmart, Kroger or just about any other grocery store.  Our little local town has three of these bad boys now.   and #3... did I mention it's only $1?  **Savvy note** it's only $1 if you return it by 9pm the following day.  Most of the time, I am passing one of these machines at some point the next day... but there are still those "doh!" moments when I forget.  

Now if you go to redbox.com, you can sign up for email alerts for the new releases, you can check and see which redbox in town has the movie you are looking for and you can even reserve them so you know it will still be there just waiting for you when you finally get there!

Another cool part of being a part of the email list is that you get Free Rental codes... that is right FREE (what is more savvy than free right?!)  Well... just for kicks... I will give you one of the free codes they give out!  The code is BREAKROOM.  Just type that in, you will still need to swipe your credit/debit card (in case you keep it longer than a day!  If you haven't used it before, you won't be sorry... I love it and we use it regularly.   

Stay savvy... and take a break every now and then!

Wednesday, March 3, 2010

Happy Smile!!!!!!

I have been using Peelu toothpaste for about 2 months now and I love it.  It is a different texture than most toothpastes but my teeth feel so clean when I use it.  


*For centuries, people of Asia, Africa and the Middle East have cleaned their teeth by chewing the dried branches of the Peelu tree. Peelu (botanical name: Salvadora Persica), also regionally called Siwak, Miswak and Neem, means “Tree for Tooth Care."

Despite its long history, Peelu tree branches have only been used in the form of a chewing stick. The Peelu Company, for the first time, converted its remarkable qualities into a toothpaste, tooth powder, liquid extract and a dental chewing gum.

The researchers discovered a number of naturally occurring qualities in the peelu tree, including:
  • It contains a natural chlorine which whitens and removes tartar and stains (tartar is the yellow material on the teeth, chiefly Calcium Phosphate)
  • It contains Tannic Acid and Vitamin C, making it beneficial for healthy gums
  • It contains sulfur, which helps keep the mouth clean


Clean your teeth the natural way! Peelu Toothpaste provides safe, effective dental care with a 100% natural, state-of-the-art formula. Most toothpastes and polishes contain harsh, gritty abrasives like sand (silica), chalk (calcium carbonate) or animal bone (dicalcium phosphate), all of which can irritate gums and damage teeth by thinning the enamel layer. This can cause teeth to yellow and be more sensitive to heat and cold. Peelu Toothpaste uses the soft fibers of the peelu plant to bring you a gentle, nonabrasive toothpaste that works naturally to clean and brighten your teeth. Unlike most other brands, Peelu Toothpaste is sugar-free, contains no artificial sweeteners or preservatives, and uses only natural flavorings. *

*information copied from www.peelu.com*


 Thanks for reading!!!!
"CRUNCHY"

Geeky Gifts!

OMG!
{Oh My Geek}


Whoa look what  Icon Pillows is doing...

{even though I know I these are just pillows...i got a little excited seing the (4) message icon}

{I *heart* blogger}

{These are so super cute and T-Totally *GEEKY*}

That was fun!!! Have a Geeky Day!!!

Oh and just so ya know...
I'm giving away a

*FREE*


over at iheartsmiles blog!!!


Oh and P.S. I lost 4 lbs this week during Stylin Fox's Slim by Summer Challenge!!!
Go me!!!

-Geeky out!!!

Monday, March 1, 2010

I'm totally crushing on...

Hedgehogs!

I recently participated in a Pincushion Swap over at Freckled Nest.  I had to mail out a pincushion to my partner by this past weekend and I, of course, waited till the last minute.  I didn't want to make your everyday pincushion.  So, in a mad frenzy, I started searching some of my fave sites for pincushion inspiration.  When I found this
I was in LOVE! 

Anyone that knows me, knows I like to have a pattern for everything!  I don't know why, but I basically refuse to try and make my own pattern.  That's just how I roll!  Did I just say that?  Ugh, I'm a dork.  Anywho...here's the pattern from Urban Debris
full size pattern here
It's super easy and it takes all of 45 minutes, if that.  I wanted to add some to mine, so mine took a little longer, but not much.  Here's my completed hedgehog
Eeek!!!!  Isn't she cute?!?!?!
I hope my swap partner loves it...I know I do!

Have a great day!
-Crafty

Friday, February 26, 2010

a REAL eye opener!

I wear, and swear by, liquid black eyeliner.  Everyday.  Morning and evening.  I started wearing it when I was in high school.....I remember seeing Selena and deciding right then and there liquid was the ONLY way to go.  I used to wear pencil liner but it would get all over my lids and look none-so-foxy, so this little make-up product is a gem!

My preference is Revlon Color Stay liquid liner in blackest black.  It really does stay and just gives a sharper, more classic look.  The absolute BEST part of this is that the tip of it is like a pen.  It's not as messy as a brush and you can get the thickness that you want with barely any room for error.  (I learned on Clinique's liquid liner-- and while it does last for-ev-er, it was a booger to put on....too many "DOH!" moments for this stylin fox!)  You can wear it with shadow for a super dramatic look, but I think it's best with just some mascara for a cleaner notice-my-eyes-more-than-any-other-feature kind of statement. Either way, you are sure to look foxy!

To apply liquid liner----clean off some of the liner on the inside of the bottle (start out with a little....it's easier to add than to try and remove).  Begin lining as close to the lashline as possible in the center of your lid going to the outside corner.  Make sure you get it as thick as you want it.  You can take it just to the corner for an everyday look, or swoop it out a bit for are-they-or-aren't-they cat eyes.  Without dipping the pen again, go to the inner corner of your lid and very carefully draw in towards the starting point.  While you are learning to perfect this, it's best to go in shorter strokes to make sure you don't get it too thick.  You want it to grow in thickness from the inside corner to the outside.  The real trick, however, is getting the other eye to match.  It just takes a little bit of practice, but you will get there in no time!  Don't get frustrated....I've been doing this for about 12 years and it's still the longest part of my make-up application.  The main things to remember are: 1) do not stretch out your lid with your finger!  Other than possibly making unncessary wrinkles (gasp) it pulls the lid to unrealistic lengths and can cause gaps in the liner.  When you release it to it's normal shape there's no telling what you'll end up with!  If you need to stretch your lid, simply raise your eyebrows.  2) your eye make-up should go on in this order---eye shadow, mascara, eye liner.  If you put on mascara before shadow, the shadow can get stuck in your mascara.  If you put eye liner on before shadow, it won't be as sharp.  If you put eye liner on before the mascara, you can clump your lashes together and make the mascara situation a situation. 


Disclaimer:  As with anything, there is more than one way to do it and, sadly, liquid liner is not for everyone.  If you try my method and find yourself still having some issues, before you hang it up try Trish's.  She is a bit different about it than I am (she likes the pull method), but I love liquid liner so much I am making sure you have options! If after trying both ways the look is not working for you but neither is the pencil, try a gel liner or a dark shadow using a brush like this one.  You can click here to see the info on this particular brush!
  Questions?  Just ask 'em!  And as always, stay stylin...like a fox!!
(so far so good this week.....hope you are feelin even foxier!)